Saturday 31 October 2015

Halloween Pumpkins

Happy Halloween!!!

I have carved some more Pumpkins! I have already done blog post this year on how I carve my pumpkins Here! So this post is just pictures of my new creations!! Hopefully this gives you some inspiration, make sure you show me how you carve your pumpkins this year?!?! I love to see them!!

Why can't we carve pumpkins all year round?? I love it so much!!

These are the three Pumpkins that I bought from Sainsbury, The huge white one is called a Ghost pumpkin and it cost £2.50, the medium pumpkin cost £2 and the tiny on cost £1.


Here are my creations!!!! I love them, and without blowing my own trumpet I am very very proud of them :D


Talk soon x

Sunday 25 October 2015

Girl Online On Tour Review - No Spoilers

I don't really know where to start! Zoe has done it again, created another AMAZING book!! I can garuntee this one will be a number one best seller as well, I am so proud of everything she has accomplished.
I suffer with severe anxiety, I won't go too much into it but it does take over my life and I'm currently working on sorting that out and Zoe is playing a huge part in that for me, I don't think she realises that every project she completes, truley makes me realise that I am more than capable of living a successful life myself!! For everything you do Zoe I am enternaly greatful!

So the book! I will quote some bits of the book but I promise I won't ruin anything or reveal any big secrets and surprises!

First of all what an emotional rollercoaster! I smiled, I laughed, I cried and cried some more, I felt heartbroken and love struck!! Every emotion possible I felt while reading this book.

It is a perfect sequel to Girl Online and I don't think there is anything I would want to change. I really connected to Penny in the first book, (mostly because I can relate to her so well) so when I got reading the second book I just felt so much emotion for Penny! She is a wonderful character!

"I know that anxiety is a part of my life, and maybe in time I can change that, but for now I want to live a full life. I have anxiety, but it's not who I am"  Penny P
This is probably my favourite quote from the whole book, I could learn so much from this quote alone, it's inspiring and true! Don't ever let anything define who you are.

I don't want to say too much because I do not want to ruin the book, but 1001% you need to read this book, although I'm sure 90% of you reading this post already have the book! Here are a few pointers, Penny style, to reading this book.

5 ways to survive reading Girl Online On Tour (GOOT)

1. In private

Do not!! I repeat DO NOT! Read this book in public, especially the ending! Unless you're happy to bawl your eyes out in public. I was struggling to read the page through my tear soaked eyes!!

2. Day off

Take the day off work, school, life ect. You are not going to want to put this book down, so dedicate an entire day to laying in bed, with a hot chocolate & tissues at hand, and get reading!!

3. Prepare

You're about to go on an emotional roller coaster, prepare snacks, drinks and anything you think you may need throughout the day, you're only going to want to stop reading for toilet breaks, even then I guess you don't have to stop reading??

4. Picture ready

Make sure you take a really cute picture of your book with some tumblr props to make the perfect picture and tweet/Instagram/post it on any social media you have Zoe wants to see the pictures!

5. Reality

Finally when you finish the book you need to bring yourself back to reality and remind yourself that Noah is a fictional character :( sadly!! But we all have our very own Noah's out there so don't threat!!

Remember there is life after GOOT! Enjoy the rest of the post;)

My main concerns are...

Will there be a book 3!?!?! PLEASE let there be a book three, I need too find out what happens in the future for Penny!

"I guess now it's kinda the end of the film... But it's not the closing credits"
&
 "It might be the end of this chapter. But, for us, our story is only just begging"

These quotes fill me with hope that there will be a third book!!!

Also these books would make one hell of a movie! I may be wishing for a bit too much but anything is possible, Zoe you need to think about directing your own movie!! How amazing would that be?? Another project to add to your huge success!
I'm joking! (Kind off (not really))

Girl Online... Going Offline xxx

Wednesday 21 October 2015

Halloween Cupcakes

I'm sure you have all realised that I am a little bit Halloween obsessed!! So here is another Halloween inspired post, I have made some Halloween cupcakes and they were so beautiful and yummy! Let's get into this!!

I used this cook book and used the Vanilla Cupcake recipe. You can make which ever mix you like though maybe even with some Halloween flovours such as pumpkin, cinnamon ect. But I stuck with plain and simple!!


Cake mix recipe:
80g Butter
280g Caster Sugar
240g Plain Flour
1 tbsp Baking Powder
1/4 tsp salt
1/2 tsp Vanilla Essence
240ml Milk
2 Large Eggs

First of all you want to preheat your oven to 190°
Then line your muffin tin with cupcake cases.


To begin with make sure all the dry ingredients have been sifted, you are then going to add the flour, caster sugar, butter, baking soda & salt to your mixer and slowly mix till they are all mixed together nicley and the butter has formed small bread crumbs.
I then like to add the vanilla extract and eggs into the milk and mix well together, then bit by bit add the milk mixture to the dry ingredients until your cake mix is smooth with no lumps left.


Spoon mixture into the cupcake cases so they are just over half full.


Put in the oven for 18-20 minutes, until golden brown.
Let your cup cakes cool down completely before you decorate.


Now for the FUN part!!

Butter Icing mix:
500g Icing Sugar
160g Butter
50ml Milk
A splash off Vanilla essence
& Topping of choice


To make the butter icing you put all the icing sugar, butter and milk all in a mixer and SLOWLY mix them in, I say SLOWLY because if you put your mixer on full you will be standing in a white cloud within a second. You want to mix the icing until it is all combined with no lumps.


This is where you get to be so creative, which is my favourite part! I have decided to do a Halloween colour scheme to decorate my cakes, I'm going to make an Orange and a Purple icing. So I'm going to separate my icing into two and add my colouring!


You then put the two coloured icings into the piping bag side by side, I then piped rose swirls on my cakes and you get a gorgeous effect from the icing.
I then added a few golden balls and they were finished!


I had four cupcakes left so decided to be a bit more fun and make some Halloween character cupcakes, I chose to do some frankenstine cakes.

First of all I mixed up some icing sugar with water to make a simple icing mix.


I then added my green food colouring until i was happy with the colour of my icing.


You then want to cover marshmallows in green icing and stick them on top of the cupcakes. Then cover the rest of the cake in the green icing. Leave that icing to set and dry.


I then mixed black food colouring into muy left over green icing, I am going to use this to draw the faces on my marshmallows.


I then added some green smarties into the side of the marshmallow and then they were finished!


They defiantly look fun and you could try so many different styles and charecters go to town and have fun!
If you do make any cupcakes be sure to tag me on twitter or Instagram I would love to see your creations!!

Talk soon x

Sunday 18 October 2015

Products I've used - Empties

Ohh how I have loved collecting my empty bottles, I feel like a lot of them are from the shower because I guess I use a lot of stuff in the shower everyday!! However I have tried to include lots of different types of things, I hope you enjoy seeing what products I have used up!


Vera Wang - Princess Purfume
This is by far my favourite scent ever!! I have loved this pufume for about 5 years now, and I never get bored of it nor have I ever found one I like more! I never worry when I finish one of these because there is always another ready on my shelf! I remember one year I got this perfume off my mum&dad, my boyfriend and a friend!! That was a good christmas :D

Simple - Kind To Eyes Make-up Remover
I have gone through several of these and I always repurchase it because this one just works so well for me! It doesn't irritate my eyes and I do have quite sensitive eyes, and it always removes all my eye make-up. It does what it says on the tin.

I Love Raspberry & Blackberry - Bubble bath
I almost didn't include this because I cannot remember for sure where I had bought it from, I am going to guess Boots but I am not 100% sure! But I did love this stuff it smelt amazing although I did feel like I needed to use quite a lot of product to get a good amount of bubbles! No wonder it ran out so fast.

Simple - Blackhead Eliminating Scrub
Finally I finished this scrub, this scrub lasted forever!!! Which I guess is a good thing. I have loved using this face scrub and don't get me wrong it is a good quality face scrub but I don't know if I will defiantly be repurchasing it. This is just because I don't feel like it has had a huge impact on my skin and I am still on the hunt for a perfect face scrub for me!

Maybelline - Mega Plump Volume Mascara
I know the mascaras take a very long time to run out but whenever my start getting a bit flaky and dry I am finished with it because I feel like you stop getting the full effect once they have pasted that stage! This mascara was a really lovely drug store mascara but I doubt I will repurchase it purely because I never buy a mascara more than once because I always want to try new ones.

John Frieda - Go blonder Lightening Spray
Some of you may know that I do love the John Frieda Go blonder range I done a blog post on what products I use if you're interested in that then check that out .....
I am feeling a bit on the edge with this range now, I decided to use this because I wanted to change up my hair but didn't want to dye my hair because I didn't want to damage my hair... blahhh blahh! Over time of using it I have realized this is damaging my hair, it is a lot more elastic and dry! But I am now in a vicious circle of if I stop my darker blond hair demos through and I have terrible roots! No idea what to do now!

Swizzels - Double Dip Body Scrub
This is one product that I was happy to finish! I do not believe that this is a scrub at all!! There was the tiniest, lamest, softest exfoliant balls in her ever! I basically had to use the whole pot on my body to get any sort of "scrub" out of it. One good thing is it smells really good but that is about it!

Zoella Beauty - Fresh Fizz bar
LOVE LOVE LOVE! I need to pop out and buy another one now!! I am in love with all of Zoes product ranges and just cannot get enough of them, they smell and amazing and they do exactly what they are meant to do. I can't fault any of her products, maybe I'm a bit bias because I am a huge fan of hers but I'm not lying!

I hope you have enjoyed seeing what products I have used up, if you like posts like this then let me know and I will create some more different ones!

Talk soon x


Wednesday 14 October 2015

Pumpkin Carving!

Since it's almost Halloween I thought I would try and get as many Halloween posts in as possible, because I love Halloween!! So today I am going to show you the steps of how I carve my pumpkins! This was a practise run, I am aware that this pumpkin will not make it to Halloween haha!

Firstly and most importantly you're going to need a Pumpkin of course! I absolutely love going into a shop and searching through there collection of pumpkins to find the right one for me! I got this guy from Sainsbury for £3.

Secondly you're going to need some pumpkin carving tools, you can get pumpkin carving kits but there is nothing wrong with some good old kitchen knives, a big spoon and a skewer. You will also need a bowl for all the mess!

Right so that is my table all set, try and make sure you have got everything you need at the beginning it makes the carving a much more relaxed and fun experience.

The first thing you need to do is cut a circle out of the top of your pumpkin, this is how you get all the guts out and then you use the top bit as a lid! You can be as adventurous as you want, it doesn't have to be a circle.

Make sure you clean all the pumpkin guts off the lid. I then also like to carve down the edges a bit just so it slots back into the top a bit easier.

Now time for the fun and messy part! Removing all the pumpkin guts, this can but a bit of a workout but keep going it will be worth it!

I like to use a big spoon for removing the guts, I scrap the spoon along the edges and this removes everything. It can be really hard to get all the stringy bits off the wall but by scraping the spoon along it works like a dream!

You should then be left with a nice empty pumpkin...

And a bowl full of pumpkin guts!

A little trick I like to do is add a couple of toothpicks just under where the lid will sit just so it stays in place nicely.

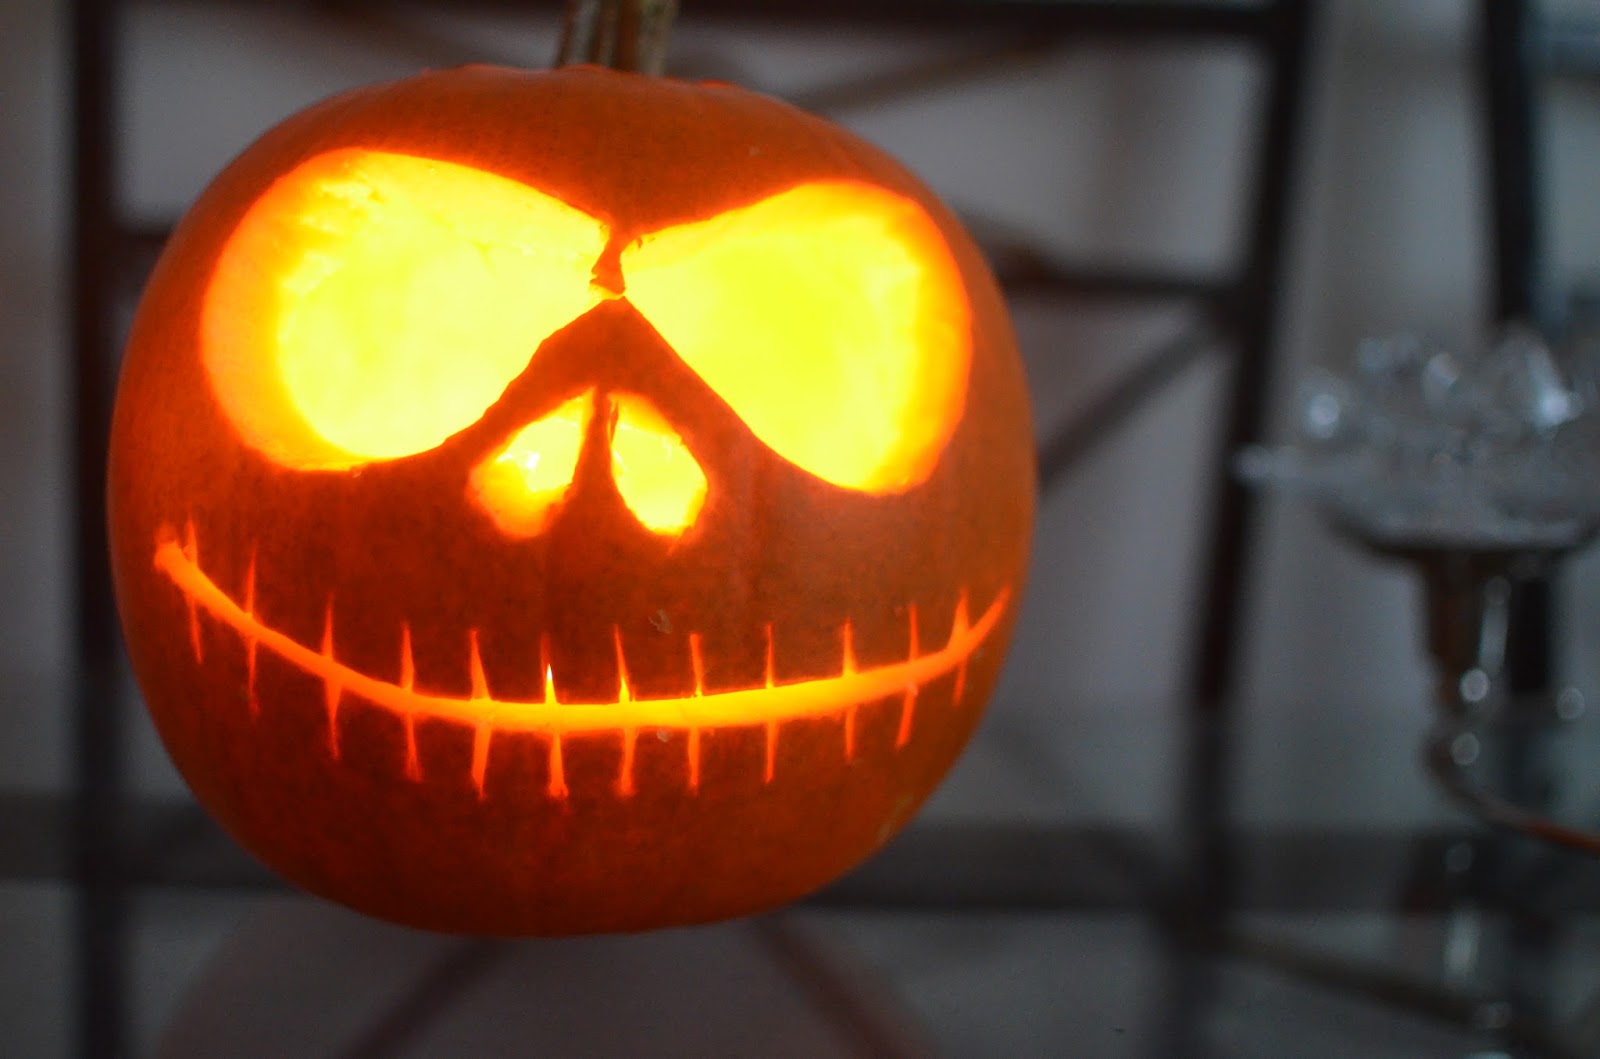
This is down to personal preference but I like to draw a face design on my pumpkin to use as a guideline while cutting! I think it helps with getting the positioning and sizing of the face correct, cause once you've carved it there is no going back! I've gone with a bit of an angry scary pumpkin face.

This is my pumpkin all carved out and I am very very happy with him!! I wish he would last till Halloween :( As you can see I used a couple of techniques, you don't just have to cut holes into your pumpkin, I like to carve off the skin so that you still have pumpkin but it's a different colour, this is what I've done with the eyeballs and the teeth! I used the skewer to help poke out the unwanted bits of pumpkin, and I used the knives just to literally carve over my drawing!

My pumpkin with a candle inside!! I personally think he looks great haha!


If you carve any pumpkins this year please do tag me on instagram or Twitter my links are on my home page, I would absolutely love to see what amazing creations you come up with! I also have some really cool ideas for my pumpkins this year so I will probably do another post on them ones for you! 

Talk soon x